CREATE NEW EDM MAPPING
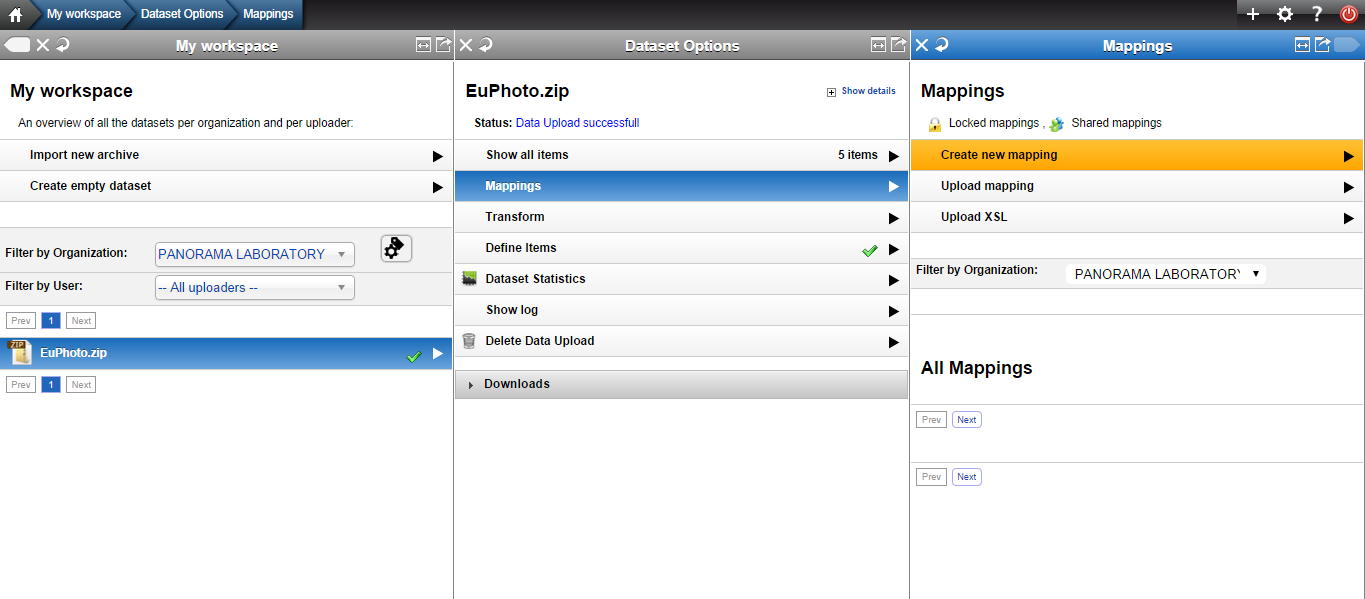
From “My Workspace” click on the file you have imported. The “Dataset Options” appear where you select/click on “Mappings”. This opens the “Mappings” pane where you can do the following:
- create a new mapping
- upload a mapping
- upload an XSL
and in general manage the existing mappings.
By selecting “Create new mapping” , the “New Mapping” pane appears. Give a Name to the box “Mapping Name”. Select the schema in which you want to transform your metadata and click “submit”
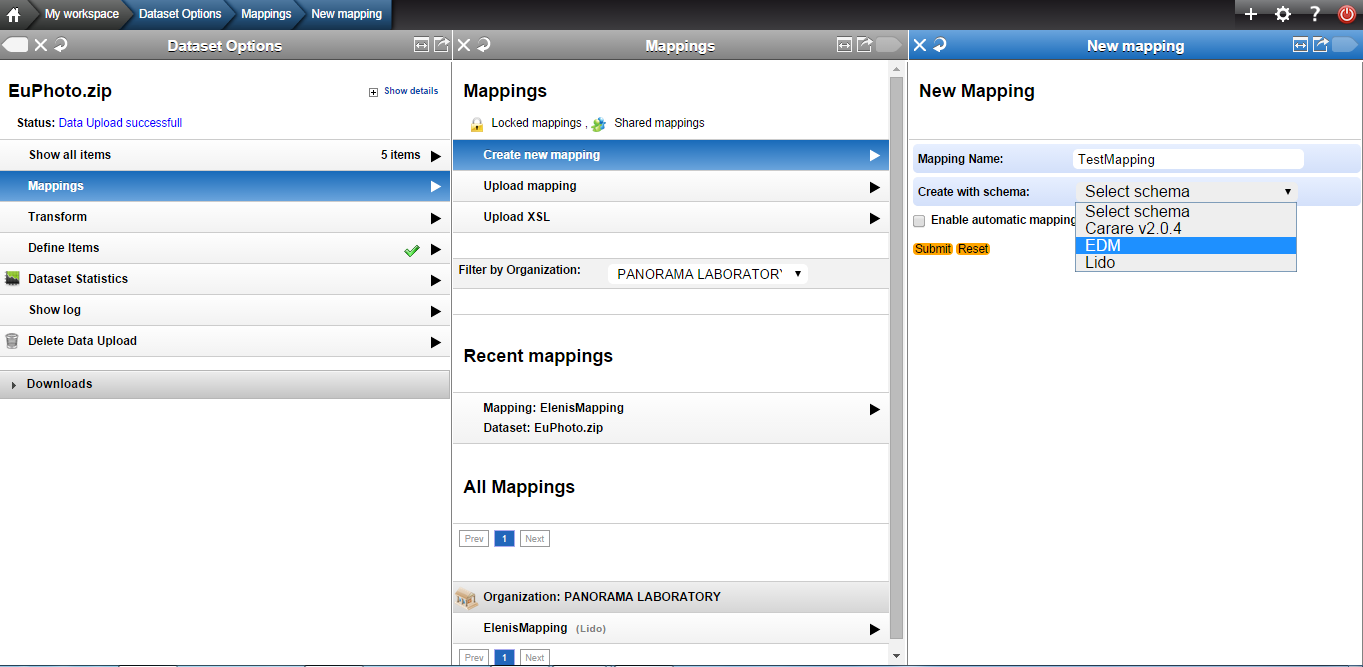
After clicking the “submit” button, the mapping with the specified name “the mapping editor” appears

Exercise 1: Create new mapping
- Create a new mapping to the EDM schema with the following title:
- yourName_surname_mapping
VIDEO for Mapping creation
Mapping editor
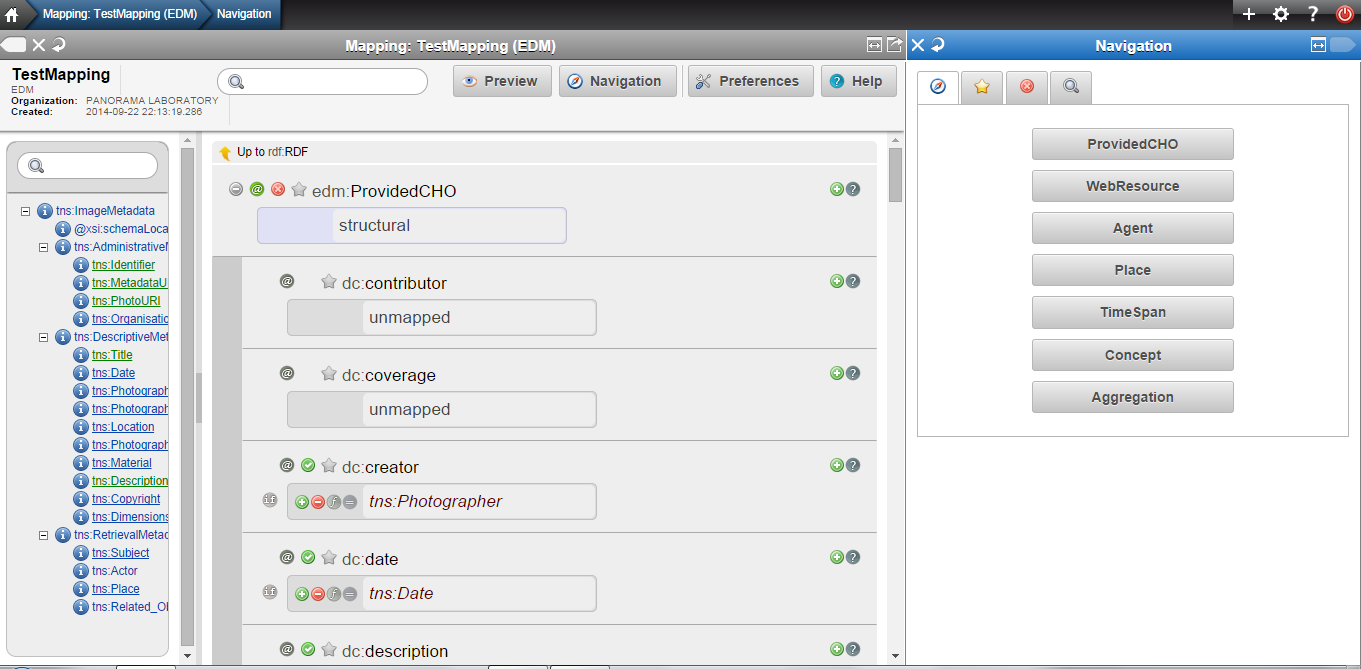
The “Mapping editor” is divided into three areas
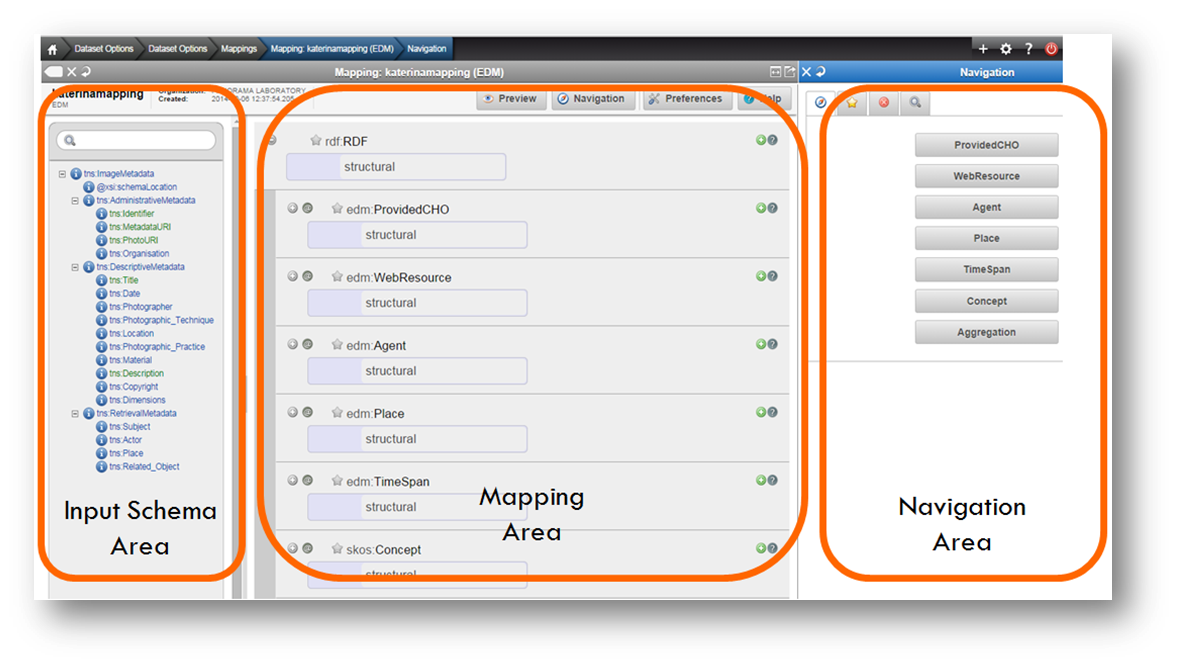
Input Schema Area
The structure that corresponds to a user’s specific import is illustrated in the mapping interface as an interactive tree that appears on the left-hand side of the editor. The tree represents the snapshot of the XML schema that is used as input for the mapping process. The user is able to navigate and access element statistics and also to search the tree by using the text field on the top.Elements in green color show that they have unique values.

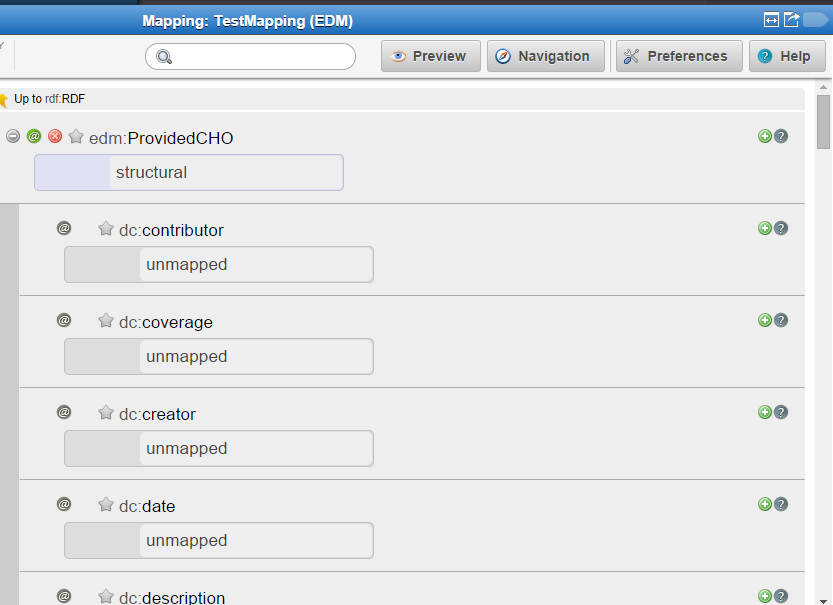
Mapping Area
The mapping area, illustrated in the middle part of the screen as a tree structure of embedded boxes, represents the internal structure of the complex element. The user is able to interact with this structure by clicking to collapse and expand every embedded box that represents an element, along with all relevant information (attributes, annotations) defined in the XML schema document.
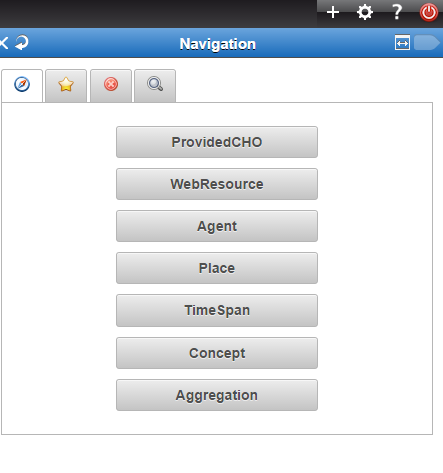
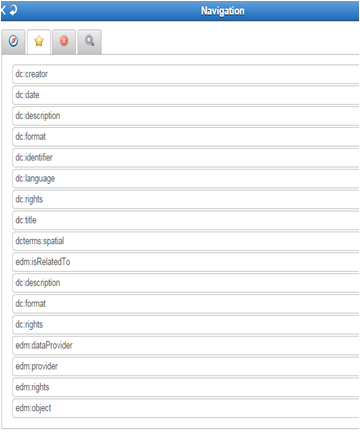
Navigation Area
On the right-hand side, buttons correspond to high-level elements of the target schema (if not visible click on the button ![]() on the top right of the ingestion platform) and are used to access their corresponding sub-element.
on the top right of the ingestion platform) and are used to access their corresponding sub-element.
Navigation Area – Bookmarks
A user can set / unset a bookmark to an element by clicking on the star ( ![]() ) on its right.
) on its right.
By clicking on ( ![]() ) a user can see the mandatory elements that are not mapped.
) a user can see the mandatory elements that are not mapped.
Note that mandatory elements area appears when the user starts the Xpath mapping.

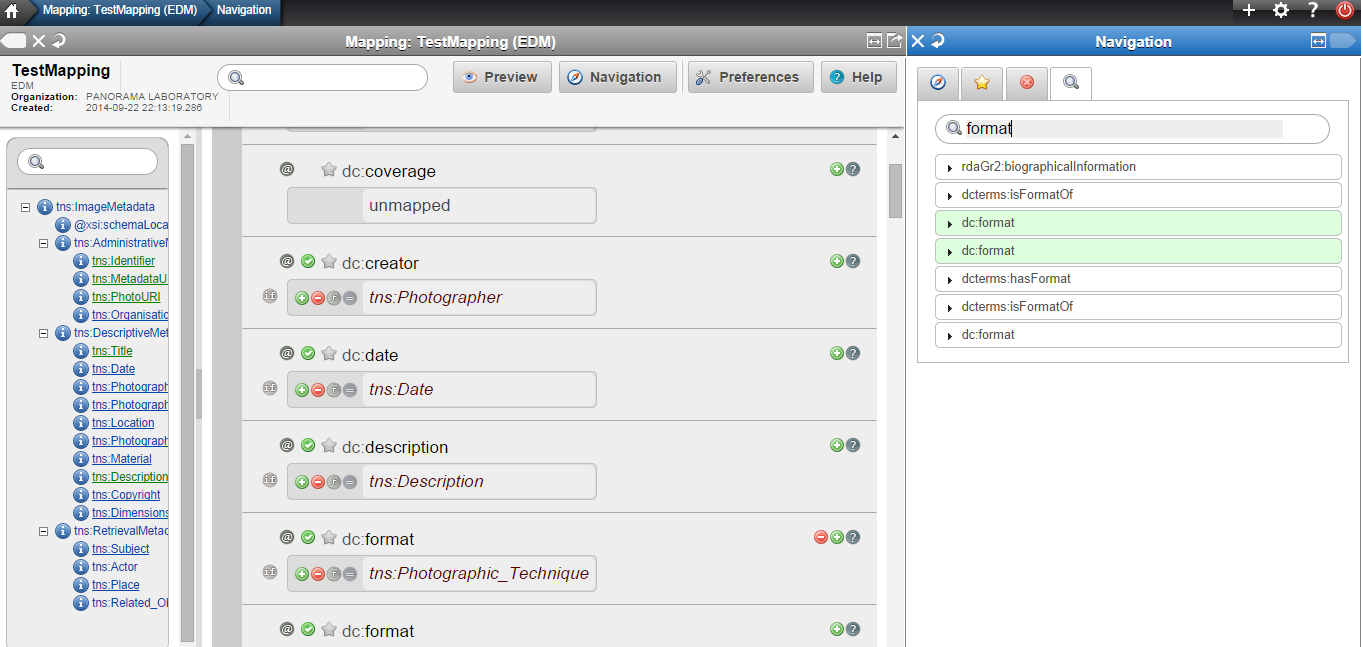
By using the search field ( ![]() ), a user can search the target schema to find easily and fast the appropriate elements. Click on the element for a quick mapping.
), a user can search the target schema to find easily and fast the appropriate elements. Click on the element for a quick mapping.
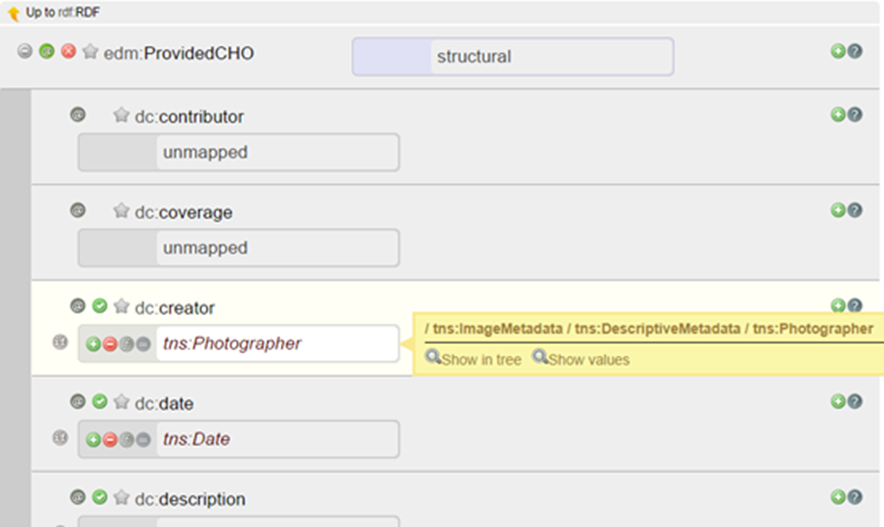
Mapping Editor Notation
As we can observe on the top of each element in the mapping area – the schema prefix and the element name are shown – (eg. edm:ProvidedCHO) there are some indicators e.g , ![]() ,
, ![]() ,
, ![]() these indicators are described in the following table.
these indicators are described in the following table.


If you move the cursor above the mapping the following shortcuts to the input tree and xpaths values appear.
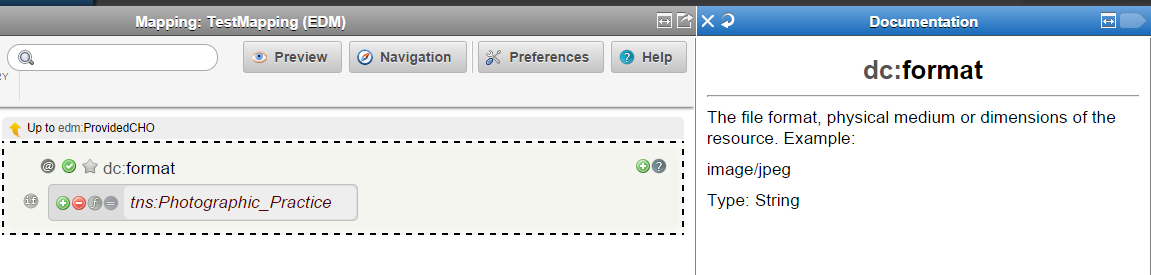
By clicking on the question mark‘ ? ‘ the documentation about the mapping appears.
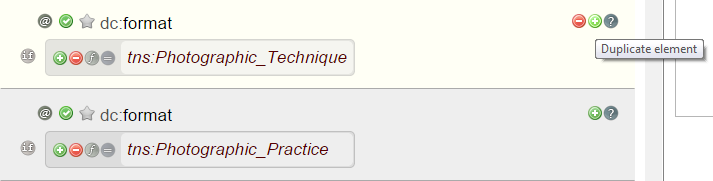
By clicking on the indicator ![]() on the right side, a user can duplicate an element.
on the right side, a user can duplicate an element.
Exercise 2: Navigation
- Navigate through the three different areas:
- On the input schema area browse through the metadata and use the search button to highlight the metadata field of title
- On the mapping area browse through the target metadata schema by using the appropriate buttons (+, -, @)
- Use the four tabs on the navigation area in order to navigate through fields, check bookmarked fields, find mandatory elements that are unmapped and search for elements
Mappings
Xpath Mapping
To perform an actual (one to one) mapping between the input and the target schema, a user has to simply drag a source element (x-path) from the input tree and drop it to the desired element (with the area named unmapped) of the mapping area. The source elements will be underlined after mapped to the target schema.
Exercise 3: Xpaths Mappings
Using the navigation tab create the following Xpaths Mappings:
| Source Element | Target Element |
| tns:Identifier | edm:ProvidedCHO @rdf: about |
| tns:Identifier | edm:ProvidedCHO / dc: identifier |
| tns:Identifier | ore:Aggregation / edm:aggregatedCHO / @rdf:resource |
| tns:ΜetadataURI | ore:Aggregation /edm:is Shownat / @rdf:resource |
| tns:PhotoUri | ore:Aggregation / edm:isShownBy / @rdf:resource |
| tns:Organisation | ore:Aggregation /edm:provider |
| tns:Title | edm:ProvidedCHO/dc: Title |
| tns:Date | edm:ProvidedCHO/dcterms:created |
| tns:Date | edm:ProvidedCHO/ dc:date |
| tns:Photographer | edm:ProvidedCHO/dc:creator |
| tns:PhotographicTechnique | edm:ProvidedCHO/dc:Format |
| tns:Location | edm:ProvidedCHO/dcterms:Spatial |
| tns:PhotographicPractice | edm:ProvidedCHO/dc:Format |
| tns:Material | edm:ProvidedCHO/dc:Medium |
| tns:Description | edm:ProvidedCHO/dc:description |
| tns:Copyright | edm:ProvidedCHO/dc:rights |
| tns:Dimension | edm:ProvidedCHO/dc:extent |
| tns:Subject | edm:ProvidedCHO/dc:subject |
| tns:Place | edm:ProvidedCHO / dc:Spatial |
| tns:Relatedobject | edm:ProvidedCHO/ edm:isrelatedto |
VIDEO for ProviderCHO mapping
VIDEO for Aggregation mapping
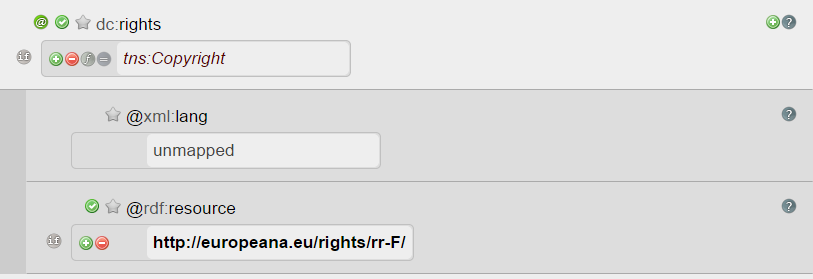
Enumerated Mapping
For enumerated mapping, the user has to double click on an element that takes values from an enumerated list. Then click on “Apply” button.
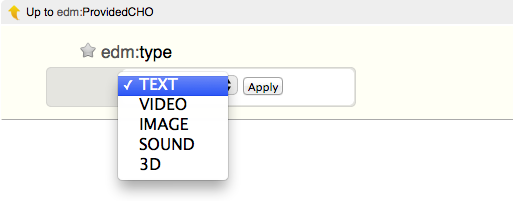
Exercise 4: Enumerated Mappings
Using the navigation tab create the following Enumerated mappings:
| Target Element | Value | |
| edm:ProviderCHO/edm:type | IMAGE | |
| edm:ProviderCHO /edm:rights / @rdf:resource | http://www.europeana.eu/rights/rr-F/ | |
VIDEO for Enumerated mapping
Constant Mapping
By double clicking on the unmapped area, the user can define a constant value mapping. He/She can type a constant value in the provided text field. The value appears in the mapping area and in the resulting XML files. This type of mapping is useful for text that is intended to appear in all transformed items.

Exercise 5: Constant Mappings
| Source Element | Target Element | Constant Value |
| tns:Organisation | ore:Aggregation/edm:provider | NTUA |
VIDEO for Constant mapping
Concatenate Mapping
By clicking on the icon ![]() the user can perform a concatenate mapping i.e to combine more than one mappings for producing a new mapping.
the user can perform a concatenate mapping i.e to combine more than one mappings for producing a new mapping.

Exercise 6: Concatenate Mapping
The target field of the navigation ore:Aggregation/@rdf:about should take its value as a concatenate mapping between the source element: tns:Identifier and the static text “Aggregation”
VIDEO for Concatenate mapping
Functional mappings
By clicking on the ![]() button the user can perform a functional mapping i.e to modify the value from an input xpath by applying a string manipulation function to it.
button the user can perform a functional mapping i.e to modify the value from an input xpath by applying a string manipulation function to it.

- Substring – You set the start and the end index.
- Substring after – You set the substring of the original string after which the value is taken.
- Substring before – You set the substring of the original string before which the value is taken
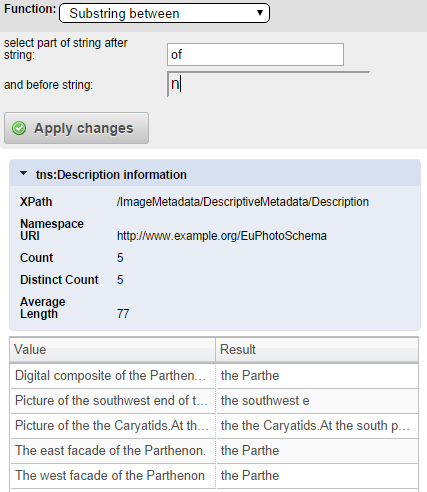
- Substring between – You set the substrings of the original string after and before which the value is taken.
- Replace string – You set a string to be replaced with the replacement
- Trim – Trims spaces
- Replace with regex – Replace all occurrences matching the regular expression (first argument) with the second argument (string)
- Split – You set the delimiter for tokenization and the start index of the original string
- Tokenize content and generate an element per content – You set the delimiter for tokenization
- Custom function – You can set a custom XSLT function
Examples are given below
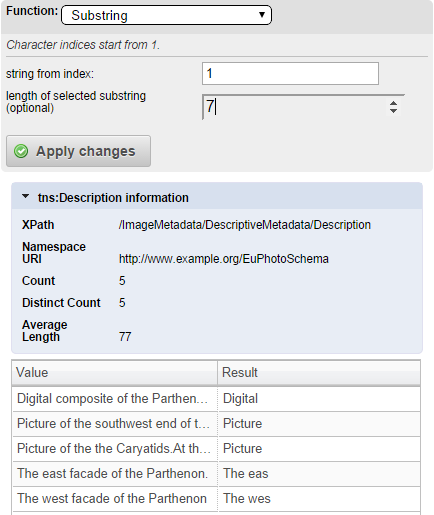
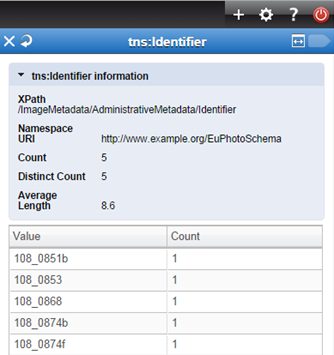
Exercise 7: Functional Mapping
Create a functional mapping from the source element: tns:Identifier to theTarget Element: edm:ProvidedCHO/dc:Identifier such that the following transformations take place (use the substring after function):
| Source Element Value | Target Element Value | |
| 108_0851b | 0851b | |
| 108_0853 | 0853 | |
| 108_0868 | 0868 | |
| 108_0874b | 0874b | |
| 108_0874f | 0874f | |
VIDEO for Functional mapping
Conditional Mapping
By clicking on the button
![]()
you can perform a conditional mapping i.e. to transform the value from an input xpath by using conditions. On the left the drop down menu with the type of condition appears that can be AND or OR. A condition is set using one of the following functions:
- Is equal to – sets a condition that is satisfied when the given xpath is equal to the given value.
- Is not equal to – sets a condition that is satisfied when the given xpath is not equal to the given value.
- Exists – sets a condition that is satisfied if the given xpath exists. It is important to note at this point that the fact the xpath of an element exists in the input tree does not mean that it exists for all the data in the imported collection. (In other words the input tree shown on the left aggregates all the possible xpaths found in the input data).
- Does not exist – sets a condition that is satisfied if the given xpath does not exist. It is important to note at this point that the fact the xpath of an element exists in the input tree does not mean that it exists for all the data in the imported collection. (In other words the input tree shown on the left aggregates all the possible xpaths found in the input data).
- Contains – sets a condition that is satisfied if the given xpath contains the given value.
- Does not contain – sets a condition that is satisfied if the given xpath does not contain the given value.
- Starts with – sets a condition that is satisfied if the given xpath starts with the given value.
- Does not start with – sets a condition that is satisfied if the given xpath does not start with the given value.
- Ends with – sets a condition that is satisfied if the given xpath ends with the given value.
- Does not end with – sets a condition that is satisfied if the given xpath does not end with the given value.
If the value of xpath tns:Description contains “southwest” then the value of the xpath tns:Description will be mapped to the xpath edm:ProvidedCHO/dc:description of the target schema.

IMPORTANT NOTE: To write a value the user must double click on it, otherwise the value is not saved.
Exercise 8: Conditional Mapping
Using the source elements tns:Title and tns:Photographer create the following conditional mapping for the edm:ProvidedCHO/ dc:title target field:
- If the value of tns:Title contains the word “Parthenon” and (click on
 button for adding a new value) the tns:Photographer value is Petros Katsaros then the edm:ProvideCHO/dc:title is the cocatenation between tns:Title and the String “by Petros Katsaros”
 - Otherwise the edm:ProcidedCHO/dc:title is the same as tns:Title
VIDEO for Conditional mapping
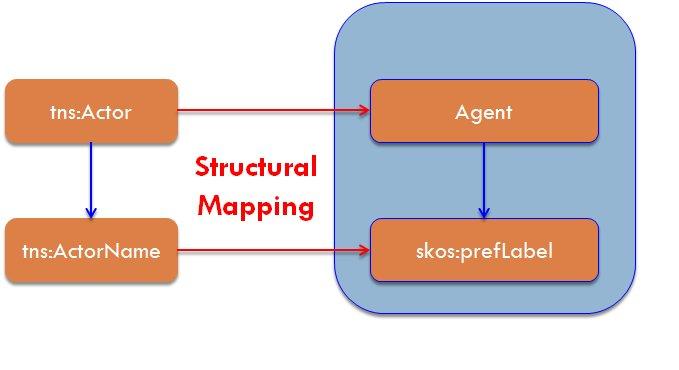
Structural Mapping
Structural mappings are a special category of mapping. As you may have noticed in the complex types of the target schema illustrated in the mapping area text structural appears instead of unmapped. At this area you can map complex elements of your input metadata.
Let’s assume you have a complex element named “B” in your metadata – having “C” as a child – and B appears 3 times in only one record. Also assume complex element “BTarget” – having “CTarget” as a child – in the target schema. If you make a structural mapping of B (by dragging it and dropping it) to “BTarget” and then you map “C” to “CTarget”, 3 “BTarget” complex elements will appear in the output XML having “CTarget” as child and having the values of “C”.
Exercise 9: Structural mapping
Create the following structural mapping:
VIDEO for Structural mapping
Value Mappings
By clicking on the icon ![]() , a user can perform a value mapping i.e. to map specific values of your input metadata to specific values that you set.
, a user can perform a value mapping i.e. to map specific values of your input metadata to specific values that you set.
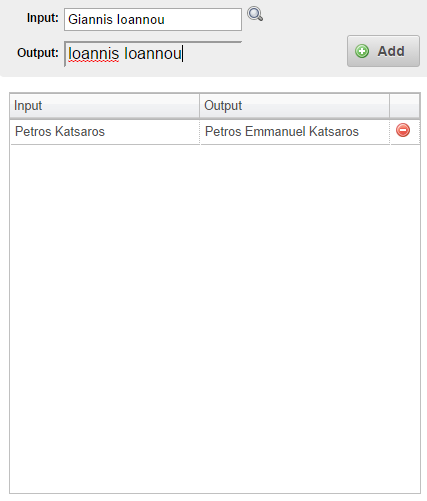
Exercise 10: Value Mappings
Create the following Xpath mappings:
| Source Element | Target Element | |
| tns:Photographic_Technique | edm:ProviderCHO / dc:format | |
| tns:Photographic_Practice | edm:ProviderCHO / dc:format | |
| tns:Subject | edm:ProviderCHO / dc:subjet | |
Based on the previous create the following value mappings
| Target Element | Initial Value | New Value |
| Edm:PCHO dc:format | Digital camera | general |
| Edm:PCHO dc:format | The photo was taken…Greek monuments | Documentary Photography |
| Edm:PCHO dc:subjet | The Parthenon | monument |
And the following constant mappings
| Xpath | Constant Value | |
| edm:dataProvider | NTUA | |
VIDEO for Value mapping EDM
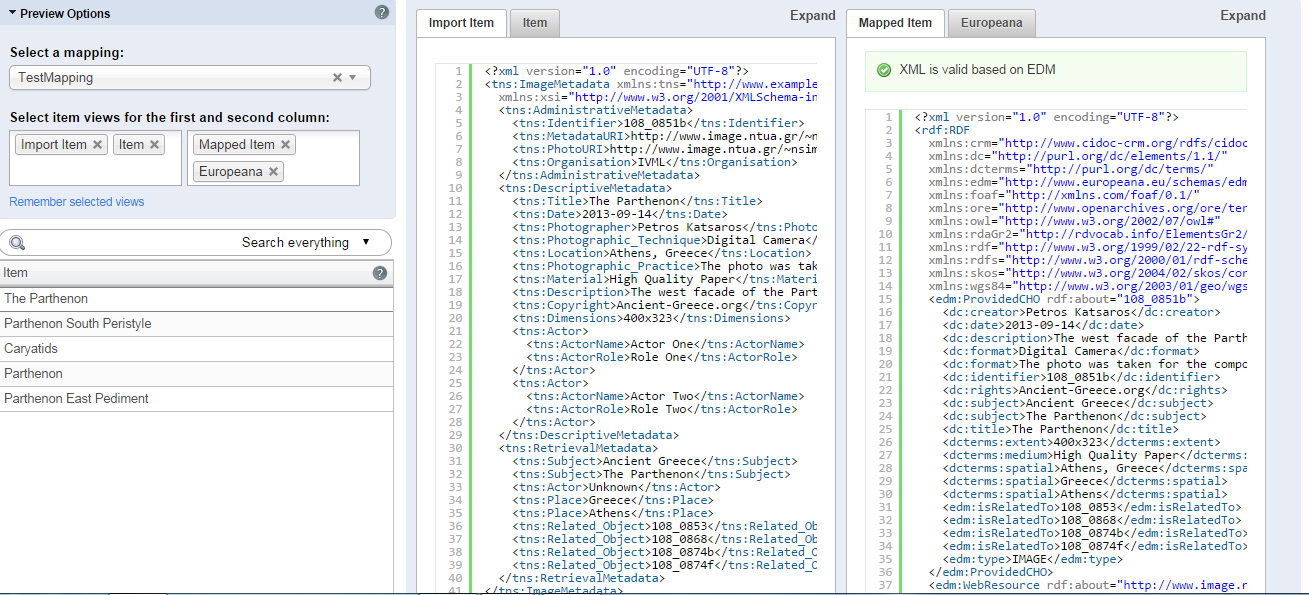
Preview items
After having performed a mapping you can preview the input files, the XSL created so far, the output files, the Europeana preview and a report of the unmapped elements or mistakes by clicking on the button ![]() on the top of the mapping tool.
on the top of the mapping tool.
Select the previews you like in each tab, click on “Remember selected views” and then click on an item.
In the below figure the output preview with an error highlighted
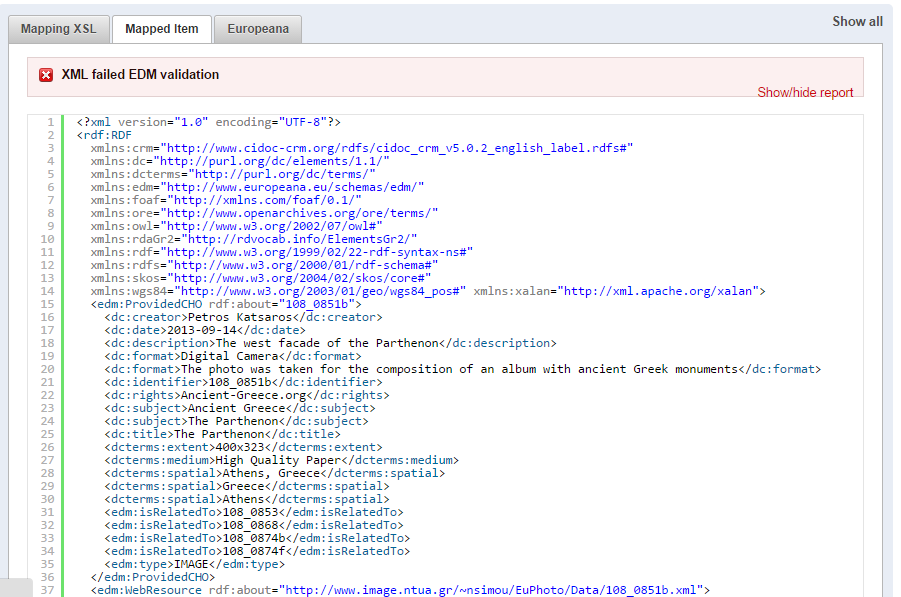
Click on the red line. More information about the error is shown in the ‘”Report pane”.

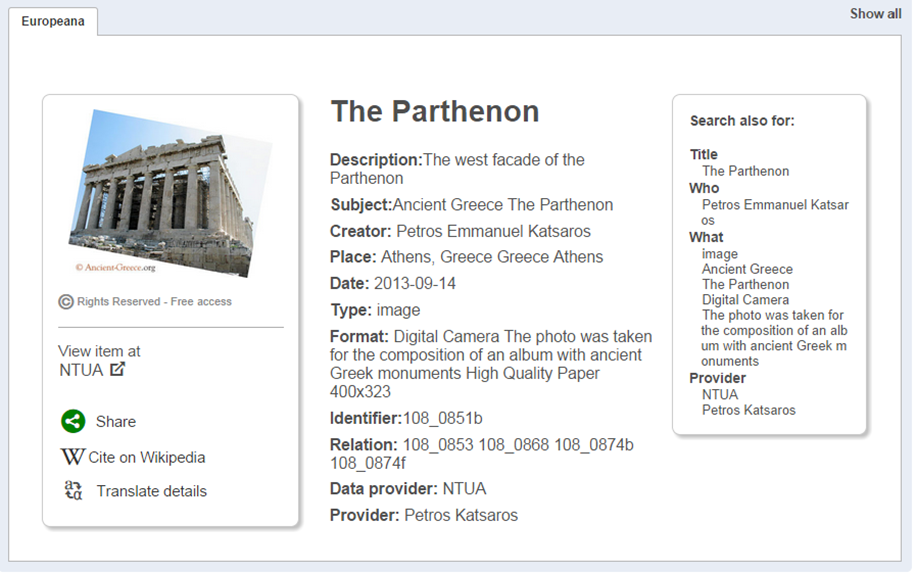
The following figure shows the Europeana preview that is very useful since it simulates the view of your items on the Europeana portal. Note that by clicking on the search button ![]() next to the item title on the top, you can switch the preview to other items.
next to the item title on the top, you can switch the preview to other items.
Exercise 11: Preview Items
For the mapping you have created click on the Preview button
- On the item views for the first column set: imported Item, item
- On the item views for the second column set: Mapped Item, Europeana
- Then click to one of the items (e.g. Parthenon) and check the initial item, its transformation to the EDM schema and how this item is displayed by the Europeana portal
- Check the mapped item for possible errors. In case of an error detect it and make the necessary changes based on the previous exercises
Exercise 12: Preview Items
In case that the mapped item created in the previews step contained no errors then:
- Deliberately create an error by removing a mandatory value
- For once again check the mapped item for possible errors. Alternatively check in the navigation bar for mandatory elements that are unmapped
- Restore the mapping to its previous form
VIDEO for EDM Preview